Tag Archives: Yoga teachers training in rishikesh

Mi encuentro con mi maestro de Sattva-

En el verano del 2013, tuve la oportunidad de tomar un journey de Sattva Yoga con su fundador el renombrado master de yoga Anand Mehrotra en Los Ángeles, California. La primera vez que experimenté Sattva Yoga, mis ojos no dejaban de derramar lágrimas de gracia por haber practicado una técnica muy liberadora que incluye Pranayama, Asana, Kriyas, Meditación y movimientos sufíes y estáticos. Fue como experimentar un entrenamiento cósmico que me liberaba de varias cargas emocionales y corporales en varios planos, no sólo el físico. Fue un verdadero descubrimiento. Había llegado a mí una yoga nueva y muy ancestral a la vez que va más allá de la postura.

blog
En ese mismo año seguí tomando clases de Sattva Yoga en Los Ángeles y decidí lanzarme a la gran aventura de entrenarme con él personalmente como maestra de Sattva Yoga en su centro de retiros: Sattva Retreat en Los Himalayas, India, en Rishikesh. La idea de ir con él en las montañas sagradas donde los Rishis y yoguis recibieron la ciencia de la meditación y yoga, era una bendición y regalo del creador, pues yo ya tenía 4 años dando cursos de meditación y la enseñanza que yo imparto viene directamente de esa zona del mundo.
Cuando llegué a Los Himalayas en India, el paraíso del universo, como se le conoce, vi con mis propios ojos porque los maestros recibieron la ciencia veda precisamente en este lugar. Es un lugar extraordinario y lleno de belleza natural. El Sattva Retreat un lugar único lleno de paz, buen gusto y con encantadoras vistas de las montañas y el río que pasa por un lado, el cual es un océano hermoso para la meditación y aquellos que ya tienen una práctica establecida.  La yoga que aprendí allí, en el entrenamiento para maestros, ha sido transformadora y liberadora no sólo para mí, si no para muchas personas y para muchos de mis alumnos. Los maestros que hemos tomado el entrenamiento sentimos como si nunca hubiéramos dejado ese lugar mágico donde parece que uno se recarga de una energía universal con la naturaleza del lugar y la sabiduría del maestro Anand Mehrotra.
Para concluir esta reseña me gustaría compartir que actualmente enseñó Sattva Yoga en Los Ángeles, CA y doy cursos en México varias veces al año. La práctica de Sattva yoga ha transformado y ayudado a muchas personas. Estoy muy agradecida con mi maestro fundador de Sattva y con toda la familia de maestros y personas que hemos experimentado juntos un verdadero estado de gozo, gracia y conciencia juntos.  He llegado a pensar muchas veces que las personas que llegan a Sattva Yoga Retreat o toman los cursos de entrenamiento son personas listas para ello y privilegiadas con una apertura global, universal, profesionales, cool, inteligentes y conscientes, verdaderos líderes del mundo actual que sirven y aportan a la sociedad, pues han trascendido a un mundo monótono o de condicionamiento y se han dado cuenta de la importancia del ser, la salud, la sabiduría, el servicio y el bienestar.  Muchos de los que hemos coincido en Sattva Retreat y en sus cursos, tenemos distintas profesiones y tipo de trabajos y verdaderas responsabilidades en la comunidad, pero nos une un estado de conciencia donde lo que importa es reconocer nuestra verdadera identidad y la capacidad de trascender para vivir la vida que siempre hemos deseado y podamos aportar a los demás.
Me encantaría que sattva yoga y las enseñanzas de su fundador lleguen a otros países del mundo y que muchos lleguen a Sattva Retreat para que experimenten un bienestar mágico y lleno de gracia.

Santa María Rivera
Educóloga, Instructora de Meditación y Yoga.
Los Ángeles, CA/ Guadalajara, Mexico

Refrence- Sattva Yoga Academy Blog post on my meeting with my teacher..

Top Eleven Things Not To Do In A Yoga Teacher Training Class

After the top ten must-do list for yoga teacher training class. Now there are top eleven things not to do in a yoga teacher training class in yoga institute. Yoga is a journey (and that letting go is too!). I hope you enjoy these and possibly even see a reflection of some of your own behaviors. None of these things are really going to add to your yoga class – so do your very best to avoid them!


  1. DON’T gasp or hold your breath or breathe through your mouth. If you hear a sudden “haaaaaaa” as you finish a pose, it probably means you’ve been holding your breath!


And mouth-breathing under stress (for example: hard yoga pose!) tends to trigger paradoxical breathing, which mimics anxiety. Always breathe through the nose, except when directed otherwise (eg kapalbhati).


  1. DON’T wear loose clothing or fleecy track-suit pants. We’ve probably all done it – or at least seen someone turn up to their first yoga class wearing classic yoga gear – long baggy pants and a loose t-shirt.


Unfortunately it traps the hot air and soaks up the sweat, making your clothes heavy, hot and clingy – and more importantly, it’s harder to lower your core temperature efficiently. Not a good recipe for hot yoga!


  1. DON’T gulp too much water. You’ll end up feeling sick and downright uncomfortable in some of the belly-down poses. Trust me … I’ve been there!


  1. DON’T talk to others in class. It is tempting (especially when a tough pose is held for a long time) to turn to your friend in class and discuss what is going on.


I’ve even heard inane conversations about “relationship issues” going on during class. Leave your gossip outside the yoga room please!


  1. DON’T ignore the instructor or anticipate poses or deliberately procrastinate. It simply means you are not “present” and you will not get the best out of your class.

1

  1. DON’T make up your own poses or do a pose modification without first consulting your instructor. It could be dangerous and you may not be approaching it in the right way.


  1. DON’T wipe the sweat away (unless it’s stinging your eyes). Your sweat is there to cool you down. It is counter-intuitive, but wiping it away WILL make you hotter.

So don’t refer this article again- http://goo.gl/fjZDzX

  1. DON’T push past pain (“no pain, no gain” is NOT yoga!). Work to your own edge – that’s all you need to do. You don’t need to do ‘better’ than yesterday at a pose. You need only to be a better version of you (and that means listening more to yourself).
  2. DON’T eat a large meal 2-3 hours before class. I won’t describe what is likely to happen!


  1. DON’T come to class after drinking alcohol or taking drugs, no matter how “brave” you feel.


(Yes, I have taught classes where someone had had a few shots before coming. He admitted it to me after class – and had spent most of the class on the floor. He said that he’d never do it again – it was that unpleasant!).


Actually it’s unfair to your teacher. They are supposed to take care of you and be responsible for everyone in the class.

  1. DON’T compare YOUR practice to that of anyone else – including your own! Who cares what you could or couldn’t do yesterday – it has no bearing on your regular enjoyment of the benefits.

Our bodies can work in mysterious ways, so just let the yoga work for you. A yoga teacher training class actually has a ton of information about how to correct common mistakes that are some students still make after years (and even decades) of practice.

Know more- http://goo.gl/YHRkbt


Reference Gabrielle

Should You Interlock All Your Ten Fingers?

There are many instructions that you don’t hear in a Bikram or hot or tantra yoga class of a yoga teacher training and you should know common mistakes and know how to fix them. Hands are the poor cousins in a yoga class where the back gets most of the attention! Oh, that and breathing of course.

But it may surprise you to discover that hand and finger positions can be critical in your practice.

There’s either little focus on it or you’ve just not been ready to make the distinctions. Either way, it’s good to delve into this seldom talked about subject. Could be your missing link!

IMG_2612


Hand placement could be as simple as placement to support the body, but in the next 2 newsletters I am going to examine those poses where you bring your hands together.

A prime example is when you find yourself with your thumbs on top of your feet. Is there really a difference if you place them on top or below the foot?

Should you follow directions and interlock all 10 fingers?

During class you may be asked to interlock fingers when your arms are straight up over your head. You could also be instructed to place them under your foot. You may be asked to pull down on your knee with fingers intertwined (Clearly not when your arms are over your head!).

So does it make a difference how you hold your hands?

You bet it does!

When I first started this yoga there were many ‘yoga commands’ that just didn’t seem right. Actually, learning from them has been a wonderful process and has connected me with my practice more than obeying every command ever could.

Many of these things I have questioned are indeed myths which will be the focus of forthcoming newsletters!

At the time, it just didn’t seem feasible that pulling my knee to my chest with interlocked fingers in “wind removing pose” could possibly strengthen my fingers to any appreciable degree. Here’s why…

In those days everyone in the studio where I went used little hand towels. Most people brought 2 little face washers or one hand towel with them.

We were even instructed to wipe sweat periodically throughout the class. Before Head to Knee pose for one. (Hey, that’s something in the ‘dialog’ even now, but it honestly takes away from your practice). Before standing bow, I wiped my knees before Wind removing pose.

“Automatically” Strengthening Your Hands and Fingers

One day I had a realization that if my fingers were really going to develop any strength at all I had better ditch the little towels and start using my fingers – wet or dry.

At first my hands slipped every class. If my nails were long I would sometimes even scratch myself with long scoring patterns whenever my limb slipped out of my grip.

Youch…

But over time my hands really did become strong. My fingers really did develop power.

Wiping sweat is a bad habit.

It is not simply about the grip either. Your sweat is one of the mechanisms your body uses to cool down.

If you wipe your sweat then your body can’t cool its core temperature as easily because there is no surface evaporation.

Your core temperature can rise and you can get yourself into a very risky situation. No kidding.

What, No More Hand-towels?

Don’t be concerned about your grip and don’t be concerned about the sweat, unless of course it is dripping in and stinging your eyes. Then and only then can you wipe sweat.

And before you know it, one day, just like me, you will find yourself feeling fabulous, dripping with sweat, having the time of your life, with a tight solid and powerful finger grip that can do just about anything.

Read- http://goo.gl/YHRkbt


Reference Gabrielle

Top Ten Things You Must Do In A Hot Yoga Class

In reality this is a lifelong journey – so appreciate that I’m summarizing a few tips that can and will make a big difference to YOU! There are top 10 things must do in hot yoga teacher training class in a yoga school.


  1. Wear the right clothes! That usually means form-fitting moisture-breathable sports-style gear such as bike shorts and lycra-style sports bras. You can wear knee-, Capri or mid-calf pants too.


  1. Drink plenty of water during the day, both before and after class. Sip water in class to replenish fluids, especially if it’s very hot (whether or not you can see that you’re physically sweating). Remember to keep sea salt in your diet (and consider electrolyte supplementation).


  1. Breathe! Yes, it’s true one can always breathe more effectively.

Watch a video on breathing- http://goo.gl/2IKZsZ


  1. Connect with yourself – use the mirror and keep your eyes open during the class (no nap taking in savasana!).


  1. Use struggle as your guide. By this I mean when things become frustrating and you find yourself struggling, this is a useful sign to adjust something – your thoughts, your breathing or a simple correction of posture. Using struggle as your guide will also help stop you going too far and exposing yourself to injury. (Another way of expressing it is this: Identify struggle as you encounter it and then move away from it.)


  1. Respect your fellow students. Everyone is on their own yoga journey. Some days you might find yourself commenting to yourself about what others are doing. You may even feel judgmental or concerned or even smug about any little thing. Or you could be comparing yourself as better as or worse than them.

Read more about cooling, sweat and hydration here- http://goo.gl/fjZDzX


  1. Follow your instructor’s directions (with an important waiver)! With a repeated set of poses the question remains: How on earth do you treat each class as if you’ve never done it before when you keep hearing the same thing again and again? Running on auto-pilot is perhaps your biggest danger. It is the opposite of being present.


It is a real conundrum and conversations with thousands of students over the years (in person and on the forum) have shown me that this is the biggest reason why people give up or consider giving up their yoga. Their solid habit is always good physically but the now mindless approach (because that’s what habits are) has ripped the soul out of their precious practice.

cropped-cropped-img1.png


The trick is to follow instructions with a critical attention to detail. Don’t just let instructions flow into you without passing through your gatekeeper. Your gatekeeper keeps you safe. Of course, YOU are the gatekeeper! Every phrase uttered has to be consumed by you and then you attempt to follow that cue. If at any time you find there is a twinge, an ache, or a feeling of the slightest bit of struggle then you take affirmative action!


Look, struggle is not the same as challenge. Challenge is good! You want some challenge. Struggle is when you feel uneasy, a pained expression, maybe your forehead has creased, your hamstrings hurt, your brow curled, or your jaw or shoulders tightened.


Sometimes all it takes is a little patience. Use a little TIME to honor your teacher AND YOURSELF and to keep you safe. Make an effort to momentarily WAIT for instructions from your teacher to process exactly what’s being asked of you before you progress. What you discover will sometimes amaze you. You might find that you can do exactly what’s said and other times you’ll realize that it doesn’t make sense or is impossible to do … or more importantly that it hurts you.


It is a CRUCIAL part of your personal development to make the right changes in your poses if you happen to interpret something in your own body as risky for you to do. This is where learning best technique is so important [and perhaps where I can help you].


Final point for now is a common example for you: If your lower back or hamstrings are hurting you in a pose where your teacher says to lock out your legs, then stop auto-pilot from locking your legs. So it does not matter if you are being cajoled to lock your legs, you keep them a little bent to keep space in your back and hamstrings. Aaaaahh! 🙂


  1. Be present. Again, running on autopilot could cause you to think about other things while absently practicing your asanas. When this happens (it happens to all of us from time to time), simply refocus on 3 and 4 and all will be well again! Self-assessment and keeping yourself safe is YOUR RESPONSIBILITY regardless of what you’re told to do. When it comes to interpreting risky instruction your body’s voice is the most important one (and more important than your teacher’s).


  1. Find your Savasanas quickly. Your practice will be oh-so-much-more effective if you go quickly, without rushing, into Savasana. So many benefits are deepened by letting go into Savasana immediately after each pose, whether you’re standing or laying down. Find your Savasana without any extra activity… no wiping sweat, no adjusting your mat, no moving your water bottle, just get there and be still!


  1. Practice your OWN class. It doesn’t matter what on earth that noodle is doing next to you, or that someone somewhere is grunting in and out of every pose. It’s YOUR class, so be in it.


Read more- http://goo.gl/YHRkbt

Reference Gabrielle

Don’t mistake this command and improve your yoga practice

Have you ever heard this type of comment in yoga teacher training class by yoga guru? “The posture/pose doesn’t start until you get your head on your knee.

Sometimes people accept things (or say things) as gospel, automatically without question (because of some deep belief). If you really want your yoga to benefit you in the deepest way possible it is worth knowing that there are ways to fulfill the greatest intention of every single pose AND not (that’s NOT) be tied to the exact letter of the script.

So let’s see what actually happens when you follow scripted instruction too literally. What happens if you believe that “the pose doesn’t begin until your head is on your knee”

logo

Why Is This Command Problematic?

Well, here’s the thing.

The intention is excellent – the idea being (and let’s takes “Standing Separate Leg Head to Knee” as the example) that you really do your utmost to complete the fullest expression of the pose.

But here’s the waiver. It’s YOUR fullest expression of the pose. It’s NOT to go TO the fullest expression of the pose. There is a BIG difference. The first honors and respects what you are able to do with best alignment. The latter will probably bypass your best outcome and will probably sacrifice your benefits. It could even because you damage.

The unconscious mind loves to respond to literal instructions. So if you don’t know what to ‘track’ for, your mind is actually going to have trouble ignoring the bad input. Especially if you go on auto-pilot for a few seconds, or stop paying attention (which happens ALL the time by the way). If you follow all commands without stopping to think or pausing for understanding, your “no matter what” style could get you into trouble!

Remember yoga is asking you to be conscious, hyper conscious even, not neglectful of what’s going on.

In other words, the scripted class, which teaches to the fullest expression of the pose to everyone in the room, implies that:

It’s the destination not the journey.

But what you’re after is to enhance the journey and not the destination.

So…

If interpreted literally, because of ambiguities and even the huge potential for different interpretations across the room, there is the distinct possibility of:

* A risk of injury

* Poor alignment at the expense of “doing a pose”

* Significantly reduced stretch and pose effectiveness

See more on this topic: – http://goo.gl/5RnhRs

So What IS Supposed To Happen?

Here are some of the reasons why getting “your head on your knee” is beneficial in this pose.

  1. It encourages a strong compressionfrom your chin to your hips, through your chest and abdomen.

Compressions such as this are super for a great many reasons. There is a ton of invisible work being done for you here!

The mysterious magic below the surface includes a stimulation that increases blood flow to the intervertebral discs (yes that does keep them healthy!). Another big plus is that your visceral organs get “stimulation by massage”.

  1. You get whole-system or systemic improvements:Your glands and organs ‘tone up’, which means better hormonal regulation, which in turn means better overall function. Yes!
  2. It’s an “energetic thing”– you effectively “complete a circle of energy lines” in the body.
  3. Helps with weight lossand shape changing, especially around the waistline when a good compression is achieved (especially because of 1. And 2. And when combined with some you-beauty backbending).

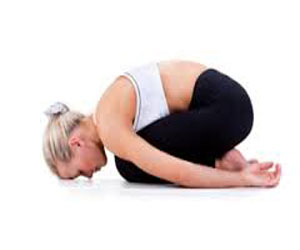
All of the above requires a ROUNDING of the spine in a forward compression – the objective being to get as much of a tight curl as possible.

And therein lies my issue with the statement … “The posture/pose doesn’t start until you get your head on your knee.”

Because you now have a potential conflict (because not everyone has the same abilities or flexibilities which even differ from day to day)

Do you:

  1. Focus on “an intense active stretch caused by rounding as much as possible”?
  2. Make the most common mistake? Do you work on getting your head to the knee and sacrifice the leg and hip alignment in the process?
  3. Or do you make the other most frequent and ‘lazy’ mistake, through lack of attention to the intention of the pose, by simply diving into the pose and … hey presto, minimal or no back rounding, just “head on knee”? You’d be surprised how often this occurs.

When in doubt, your mind will try to make your body do what it THINKS it needs to do. That doesn’t mean you are doing it correctly. There’s also a tribal or group dynamic happening here. It’s just an interpretation and in the hot room of a public studio you will often default to what everyone else has learned to do. Unfortunately, strict teaching that doesn’t allow for deviation means you bypass your own safety mechanisms and you learn to neglect your body’s own voice. That’s DANGEROUS stuff.

So points 2 and 3 (the most frequent common mistakes) often happen because of the way the class is delivered. The instructions are strong but they are also not entirely clear and the unconscious mind has to make sense of them. And that produces different results for different folk.

What your aim should be is to:

  1. Have the top of your forehead touching your “knee”(the actual touchdown point varies according to personal anatomy and flexibility);
  2. Your chin tucked in so stronglythat it could even feel a little awkward to breathe (this is why you’ll probably hear the words “choked throat”. It’s important to know that with time it can even be quite easy to breathe with your chin tucked in tight.
  3. Your gaze as you ENTERS, and during the pose, should be into your heartor higher. Most people will NATURALLY hear “put your head on your knee” and as a result actually LOOK at the knee on the way in. This is the biggest mistake. You can see that “head on knee” and “tuck the chin” don’t make it easy for the mind to work out exactly what to do. You have to train yourself to trust that in tucking your chin your head will land on the knee! Your knee is in a pre-determined place. You can trust that it won’t move by the time you curl up. 😉

What do you do if your forehead doesn’t make it to your knee?

Simple.

In Standing Sep Leg Head to Knee and in Floor Head to knee what you do is … Bend the knee to meet your forehead.*

* In Standing Head to Knee, you’ll keep working on balance and keep the lifted leg straight. Don’t get head to leg contact.  Just hold off and work on best technique described above and in my resources. No prizes and no benefits for ‘cheating.’

Maybe you are a “big-boned” or plus-sized peep and even bending the knee up to meet your forehead won’t work. Look, many people do actually end up with their knee bent way up, and their chin next to the knee. But you have to try with the same intention of curling into a tight ball, tucking your chin and looking up into your heart.

Believe me, the posture HAS begun!

Sure you will have to bend the leg for contact – and some people can’t manage that – but your AIM has shifted.

As a good friend of mine has often said; “We don’t ‘do’ yoga, we ‘try’ yoga”.

Maybe one day your head will meet your knee.

More importantly, YOU will be getting more benefits than the person next to you whose mind have unconsciously reacted to the scripted command and have dived forward.

Oh their head could be on their knee … but take a look at which part of their head is contacting and check out their back – there will be less rounding due to the diving. Having a slightly rounded back and your face on the knee is doing almost nothing. It’s certainly not getting the outcome of this pose.

Poor alignment = poor benefits.

Read more to avoid injury- http://goo.gl/YHRkbt


Gabrielle

What is the physiology of happiness?

The Physiology of happiness is your deep practice of yoga teacher training in yoga institute. That way, when you do dissect the poses you discover the joy of learning to really listen to your body with a deep understanding that will astound you. Here we’ll drill down into some specifics for-

  • Neck, shoulders and arms
  • Legs, knees and feet

Here will approaching your practice systematically – not by using any specific pose as a reference – but by using your body as the reference.

  1. Neck, shoulders and arms- So many yogis routinely engage this part of the body wrongly. I can see it a mile off. And with the information today you’ll be able to not just see it in yourself and others, but identify what it feels like and how to fix it. You’ll have a ticket to pain-free posture (and yoga poses)!

The way you SHOULD hold your neck, shoulder and arms is one of the unchanging relationships that you will learn to rely on in your practice. The only issue at the moment is diagnosing if you are routinely not doing it the right way.

bloghappiness copy

Like many people you may need an overhaul to what you’re doing now. It’s oh-so-easy when your mistakes are um, unmistakable and big. It’s when you need TINY changes but you think you’re doing it right and so are not looking to make any changes. So pay attention to everything and test drives it all here, now and in the yoga room.

So here’s your yardstick for your constant reminder and referral. They are ground rules for yoga and in fact ANY movements you do. They are very simple but they take a combination of practice and good-habit-forming movements and awareness to make the benefits stick!

  • Your shoulders must stay down and back so you can open up and maintain best range of motion in your shoulders, neck, back and arms.
  • Great habits here are one of the most important keys to a long neck and even a stress-free life.
  • When you learn the nuances of this important key to your posture you’ll be able to stand correctly as well as counter those forward bending, slouching, crouched over, desk- sitting, baby feeding, child holding, driving, eating (ad infinitum) postures that most of us have developed via bad habits.

The key is in a position that’s activated by ‘externally rotating’ your shoulders. You’ll be able to securely seat your shoulder blades down and back and away from the ears.

Whether you’re at your desk, shooting one arm up to the sky in Triangle pose, or curled over tightly in Rabbit there really is never a time where hunching your shoulders will help you!

In fact the simple act of holding your shoulders down and back will resolve so much tension in your back, neck, shoulders and head that your headaches may disappear, and you WILL breathe more deeply and enjoy your life more.

It is part of what I call having a “Physiology of Happiness “!

Stand this way, outside of yoga with your upper arms externally rotated and your chest lifted and discovers a new spring in your step and a compelling need to put a smile on your face. So get out there and enhance your happiness with this cornerstone life skill and yoga technique.

For more info see video- http://goo.gl/aHLuDS

  1. Legs, knees and feet- Someone who walks on the tips of their toes (and even someone who wears high heel shoes) isn’t as connected to the ground as someone barefoot who is spreading the weight consciously through the feet to support their body!

Seems obvious that how you connect with the ground really makes a huge difference to everything you do.

“Standing properly on your own 2 feet” takes on new meaning because you can really make excellent alignment start where it should … at the ground.

When you practice this yoga frequently enough you will likely find your feet change to support you better than they ever have before, especially if you learn how to use them in the best possible way.

Not just pose by pose, but in a way that helps you ‘get’ the nuances of balance and support and how it affects you from toes and heels right upwards to through your hips and shoulders to the top of your head. Onwards and upwards!

So in your practice, noticing what you do with your feet, ankles, knees and hips can form a strong focus for you … and help you enjoy more satisfying progress in every class!

>> The keys:

>> Start with feet facing forward not splayed out to the sides.

>> Feet misalign for most students when they bring “toes and heels together”. DON’T do that. Really DON’T.

>> If you squish your heels and toes together your ankles are probably squashing together too. Each is kind a holding the other up. This is disastrous for when you lift one leg off of the floor. In fact, I can see most people shift the foot on the floor to compensate the moment the lifted foot is airborne.

So… try instead to have the big toes touching but align your legs and hips and see if you too end up with a space between your heels. If you ever have trouble balancing on one leg this COULD be THE key for you.

To put it another way: Your knees face forward. As do your feet. No splaying. Hips won’t turn outwards as a result and your whole practice will be better. Could you take a little while to recalibrate your practice?

If you have knock-knees, bowed legs, pronated ankles or fallen arches the renewed attention to your lower limbs from the ground up will:

  • Correct the muscular imbalances that created the problem* in the first place
  • Set you up to benefit much more deeply than you thought possible

Just like any knew skill you learn, at first these adjustments will be difficult because they suck your attention and your energy. But after a while these adjustments will become second nature and only need checking in a holistic sense as you cycle your attention through your body.

If you like this idea then you should check out The Hot Yoga Master classes. Here- http://goo.gl/YHRkbt


I think you really will make breakthroughs if you choose to use The Hot Yoga Master Classes.


Reference- Gabrielle

Discovering Sattva…

Sattva means completion and harmony of the ying and the yang. – Anand

Before even thinking about spending sometime in India at Sattva Retreat and joiningSattvaCommunity in Rishikesh, and then decidingto take part of the yoga teacher training program…. I ‘ve already practiced yoga.

I’ve also taught some classes in my city,invited from my teacher that was so enthusiastic in having such a young student with such interest and passion for the yoga teachings.

yogafestival

I had always enjoyed it very much and felt great and deeply changed and transform after each session, having the feeling I was going into the direction of who I really am.
But every time no more than couple months would pass and whatever class I was taking or teachingwouldn’t feel “right” to me.
I alwaysfelt that the practice was not aligned to my everydaylife, or didn’t feel that I had to believe or pray some Gods in order to become a “real yogini”.

Also, sometimes, I couldn’t manage all of the energy that would arise after Kundalini practices, as I often would walk out of a yoga studio with the energy to climb a mountain. But I was in a busy town and mostly of my friendswere more interested in climbing the steps of a bar in Rome.

Sometimes after an Ashtanga class, I felt very tired for days, I needed to recover and let my body to stretch, as I felt like I’ve exhausted myself in a workout class.

I always thought that the problem was in me, in my personality,and those were the reasons why after a short time I decided toquit with “yoga”…
It felt to me as I was searching for an answer in an infinite book and that the answer I was looking for was always on the next page.
Exhausted from that search,I’ve decided to give up… and I though that I was not made for practicing “physical” yoga, so I’ve decided to focus all my practice only on meditation.
And it went well: I enjoyed many benefits and have learned the power of the mind and applied to my work as a psychologist for a while.
But again at some point I felt that something was still missing.

When I finally had a blessing to meet Anandin Italy, it was last November during his first retreat inRonciglione. I followed him with my goodfriends during this trip, and from his teachings, I’ve realized that itwasn’t me that was made “wrong” for the yoga practice.
I’d realized that what I had been through all of those years of trying to practice was just a part of the original teaching….and finally I had the answers for the questions that I had given up sometime before.
I had interviewed Anand during Yoga Festival in Milan, where he taught some classes.

F: How have you started to teach? How come you started to teach yoga?

Anand:It happened naturally since ayoung age;I just always knew.It came very easy to me; and people always came to me and asked me questions about their lives, and this is how I started.
I was studying yoga in different places,and I have found that it was always a little fragmented,it didn’t feel complete anywhere. Hatha yoga was a very specific technique and I found it very limited. For mean enlightenment is all about freedom, as I have always been a rebel and thought that anything that limits you, can’t be freeing you. So this is how Sattva was born. I realized that all the practices where not meant to be separated. This is a modern invention, where there are Hatha, Kundalini and all different practices. Sattva yoga was born out of that intention of giving a real and complete way which focus on true wisdom, intelligence, meditation, physical practices, tantra … all of it! The whole way!I’ve realized this when I went to different ashrams and saw that in some people were only meditating, but were physically unfit, and in others, people were physical fit but mentally unfit and their consciousness was very narrow, as they were doing just the asanas but didn’t know the vocabulary. So Sattva came as a result of an intention to create a revolutionary whole way, a complete way. And when I say complete, and it doesn’t meant that it has been finished or that it has ended evolving, by complete I mean that is whole and it continues to evolve, like the Universe that is whole but it’s always evolving. That how Sattva came about. Sattva means Completion and Harmony of the ying and the yang.

During the classes I had attended with Anand at that three days retreat, I had the “Sattva experience” of yoga and finally felt that I had found the practice that I was looking for but not only a practice…

Now that I’m at the Sattva retreat, and I feel this sense of deep wholeness that arises in me, Anand’s worlds keep running in my mind as I am understanding that whole doesn’t mean complete, but it means that keeps evolving, as the Universe. And me, as the Universe, I feel to have this incredible opportunity to truly and deeply evolve, expand and give up the searching for something that has to be complete. And know I understand why I was not finding what I really needed, because I was looking into “yoga” only a finished experience that would “fit” my life and not looking as experiencing life in yoga, as a “sattvic” experience.

May these worlds help you to find your answers….

In peace and profound gratitude,

Francesca

Source- Sattva Yoga Academy Blog..Read more blog..

Say Goodbye to Back pain Just in Four Simple Steps Formula with Yoga

In a class of yoga schools or a yoga teacher training can’t tell you these types of formulas. This is a “secret” – and fast – formula for fixing a backache and you should not that, if you have an injury, or suspect you have one, it’s always an idea to see somebody professional about it especially if you have any doubts.

But niggles and odd aches and pains can happen when you:

* Do some gardening.

* Do a full day’s desk works.

* Lift something heavy (say, packing boxes when moving house).

* Clean around the place / do chores (cars / house).

* Round forward for prolonged periods (manual labor etc).

Many doctors suggest you to avoid the activity and it’s very important to rest and even take anti-inflammatories  if you have an acutely sore and reactive back. This is a four step formula with great news that doing a well thought-out selection of backbends (for just about any niggle or ache) may actually restore your back to shiny and new.

Step 1:- Use a slightly under-inflated size 3 soccer or basketball (no bigger than c9 inches in diameter) and place it under the lower lumbar spine (or sacrum if you are very weak). Hold it there with 2 hands and do 10-20 leg lifts. If you can’t lift your legs off the floor, move the book closer to your tailbone.

You can see the demonstrating this here

Step 2:- Do 2 – 3 yoga Cobra Poses.

cobra1

You know Bikram style where you place your hands on the floor behind your shoulders. Rest those hands passively without pushing down and don’t use them at all in the lift.

You can see the demonstrating this click here

Step 3:- Do another 2-3 yoga Cobra Poses but this time make them arm-assisted Iyengar-style Cobras.

Place your hands a little forward of your shoulders.

Squeeze your lower body firm again as you did before. But this time, as you look up and lift up, position your shoulders down and back away from your ears and lift your body as high up off the floor as you can.

Your arms may be straight or could hold a slight bend depending on your body geometry and possibly the discomfort levels you have in your back.

Rest between and after your Cobras.

Step 4:- Take yoga Child’s Pose

child1

Keep your hands under your shoulders, your spine neutral, push up onto all 4s and bring your hips to your heels for yoga child’s pose.

See Half Tortoise photos here to turn this into Child’s Pose just bring your arms back beside you and no need to focus on any “extension or flatness” – just relax.

A surprising effect:

Do you know that feeling in your body when you are coming down with something like the flu? That’s all over achy feeling by using this formula? Yoga has a power to change the lives and your body positively. This formula is really works.

The back pain is one of the major health problems in the USA. Most of the people have not a permanent treatment for the back pain. There are six more yoga poses that can help to relief from back pain. You can also try these yoga poses that can help with back pain and you can do these poses anywhere-

  1. Downward Facing Dog
  2. Upward Facing Dog
  3. Seated Forward Fold
  4. Seated Spinal Twist
  5. Lower Back Clasp
  6. Sphinx Pose

To check out more details about these poses and more click

These yoga poses may be the best alternative for back pain relief and you can get rid backache.

Please leave your comments – I love to read them!

Some Yoga Secrets That Nobody Tells You

Isn’t it strange, that the one thing that could make the biggest difference to you and your body is something almost nobody talks about? I mean, if there’s a pill for it why bother?

OK, let’s skip the cynicism. What I mean is that, years and years could pass you by, you could go to the doctor, exercise and do sport anywhere including at school, and talk to or be taught by literally dozens of people and never be advised to do this.

I’m talking about backbends.

I can’t remember what the teacher said to me in high school when I attended yoga on my first occasions. But I am absolutely sure that nobody else, and that includes my doctor, yoga school master, yoga teacher training guru, an orthopedic surgeon I saw, anyone at school, at home, my mom, any friends, nobody in Phys Ed classes ever said I should do backbends. Not a word, nada, zip, nothing, zilch!

backbend

It’s crazy! I mean, before you started yoga, did you know that BACKBENDS were a CRUCIAL part of your overall health?

These days there really is a posture epidemic. Seeing elderly people stooping makes me stand up straighter. Hopefully it makes you stand up and walk right too! Because it’s pretty eye-opening to see someone umpteen years your senior with a hump on their back, stooping or walking with difficulty and realize you could be headed right there if you’re not careful.

But what REALLY makes my tummy turn is when I see teenagers with horrific stooping postures. Where are the people telling them that they are in for a long and bumpy future riddled with the possibility of worsening health and even worse posture (each making the other continually worse)?

Yep, young people with the bodies of 80 year olds is SCARY.I am positive that if we were taught from a young age to incorporate backbends into our lives then many of today’s problems could be a lot less prevalent.

Bend over backwards for your health … and reverse a few ills while you’re at it!

You see, most of your life happens while you’re bending forward!

Think about it. And simply look around. You sit, you stretch out for things, you do just about anything and it’s in reach through a forward bend, even if it’s up or down or under a bench. Chairs, desks, cupboards, keyboard heights and bench tops. You name it.

And to be honest you would be crazy to construct your world to make you do back bends to reach for things!

What we really need is an antidote to constant forward-bending & shoulder-rounding.

Well … H E L L O O O YOGA!

A well-designed class is actually a great balance of back AND forward bends. But the lion’s share of your time in the room will be doing backbends.

You may not know this. I certainly didn’t. The debilitating pain from herniated and so-called slipped discs is actually mostly caused by FORWARD bends. At least it gets worse with forward bends. In fact back bending could be YOUR way of treating it without having to resort to surgery.

And now for some well-placed logic..

Your spine WANTS to bend and has the CAPABILITY to bend in all directions (which we will loosely label as forward, back, left and right). So practicing backbends will actually counter the forward movements that we can’t help doing almost every waking moment (and even some of our sleeping ones)!

You can click for more: – http://goo.gl/YHRkbt OR http://goo.gl/aHLuDS

Please leave your comments – I love to read them!

Sattvic Living: Cultivating Daily Devotional and Self Care Rituals

Sattva Yoga Academy, Rishikesh

Cultivating daily rituals is an important part of living a conscious life. It is something we discuss and practice in great depth during Sattva Yoga Teachers Training and Immersions. These rituals include devotional and self care rituals. Daily meditation is a time where we open ourselves to receive grace as we are deepening in our spiritual connection, transcending and experiencing spaciousness and expansion of consciousness. During this sacred time we often times make contact with a deep state of gratitude that can only be experienced through the heart, and cannot be explained or comprehended by the mind. When we carry this state of gratitude into our day, we experience life in its brilliance. Each morning at The Sattva Retreat we rise just before the sun peeks through the mountaintops and gather with Anand Mehrotra, the founder of Sattva Yoga, at the river for our morning Sadhana. It is my favorite time of day. Hearing the sounds of running water, the bells of the donkeys as they pass by and various species of birds chirping while meditating brings forth an experience of true bliss and graciousness.

blog.jpg

In addition to daily meditation and devotional rituals, self-care rituals are equally necessary as our bodies serve as vessels, a home for the soul, for the divine to work through us. Therefore, It is so important to nourish our bodies, fostering a healthy environment physically, which begins from within so that we are able to carry out our dharma to our highest potentiality.

Here in India Ayurveda is a way of living, it means life science and is an ancient healing system dating back 1,000’s of years. As the sister science of yoga, the goal of Ayurveda is to align the body with the natural rhythms of nature as much as possible. Because in reality we are nature, nothing separates us from the tree, the ocean or the sky than matter itself. So aligning our bodies with nature¹s cycles is the key in creating balance and living our most abundant life… one full of vitality!

Ayurvedic principles suggest performing morning self care rituals in support of bringing the mind and body into a state of harmony. I have been practicing these rituals for quite some time and oftentimes recommend them to individuals who are seeking a more balanced lifestyle. If you at times feel ungrounded or out of balance, try this simple routine for 40 days to experience deeper alignment and vitality. We are lucky here at The Sattva Retreat to have a full- service Ayurvedic spa, where I love getting treatments when I feel my body needs a “re-charge”. However, this routine is easy for you to do at home or when you are traveling..

Morning routine:

Rise: with the sun or between the hours of 5 and 6am. Wakeup with nature and this is the most sattvic time of the day. Sattva means peace, stillness,
quiet. After 7:30 am rajas kick in. Rajas are movement and energy, (think traffic begins, people are outside moving, and sounds become loud) our minds
automatically align to that part of nature. By spending the first hours of our day in a peaceful state of consciousness we are open to receive, happier and clearer throughout the day. Wash your face, brush your teeth and scrape your tongue upon rising.

Meditate: Sitin lotus positionor on a chair in a quiet spaceand meditates for at least 30.minutes.This is sacred time for your soul. After you meditate light some candles, do some chanting, listen to soft music…anything to set a devotional mood, or Bhava, for your day.

Movement: Do at least 10 minutes of Asana, Pranayama or Kriyas to activate the Prana (life energy) in the body. It also will ground you into your body before you begin moving through the day. Oftentimes when we wake up in the morning we are not 100% in our bodies because we are transitioning from dream into a waking state.

Oil massage: Give yourself a massage with sesame oil, rubbing it on the body in circular motions beginning at the neck and shoulders. After waiting for 5 minutes, enjoy a nourishing shower connecting to the element of water. The oil calms the nervous system as well as removes excess vata (energy, air element within us, which causes mind chatter). You will feel more clear in your consciousness and calm all day.

Drink Hot water with lemon: Do this before eating or drinking coffee,
this alkalizes the body as well as gets the digestive system moving along.

Food: Food is Prana, life energy therefore we must be conscious of what we put in our mouths as it is our fuel. Alive, nourishing, colorful Sattvic foods from nature versus processed foods. If you ask your body what it needs it always will tell you. Just listen…Eat intuitively, balancing your meals with cooked vegetables and whole grains.

Throughout your day remember to take moments, or as I call them “sacred pauses” to connect with nature. Go outside breathe in some fresh air, filling the body with new prana. Nature always provides connection, serenity and healing. It is a space where I oftentimes find that the “answers” I am seeking are revealed.

It is my hope that after reading this you are inspired to incorporate these rituals in support of your wellbeing, leading you to experience a more conscious, abundant way of living, bringing you into deeper alignment with your true nature…sat chit ananda!

Annemarie

Sources : Sattva Yoga Academy Rishikesh Blog and Expperiance.